Selasa, 28 Oktober 2014

Blogger Guide, Comment Inbox

Blogger Guide, Comment Inbox

To make it easier for you to manage your comments, we’ve created a new Comments tab for you to access them. Here, you can manage published comments, comments that have been flagged as spam and comments awaiting moderation if you have turned on Comment Moderation.
Users with Comment Moderation turned on will continue to see comments that need moderation and have not been flagged as spam in Comments | Awaiting Moderation. Users without Comment Moderation will not see any comments in Comments | Awaiting Moderation.

Spam Inbox

Blogger now filters comments that are likely spam comments to a Spam Inbox, much like the spam folder in your email. When someone leaves a comment on your blog, it will be reviewed against our spam detector, and comments that are identified as possible spam will be sent to your blog’s Spam Inbox, found at Comments | Spam.
You can help improve our ability to automatically detect spam comments by checking your Spam Inbox and deleting spam comments and marking real comments that may have been flagged as spam as Not Spam.
If you have questions about what constitutes spam on Blogger, please review our Content Policies.

Blogger Guide, The word-verification option

Blogger Guide, The word-verification option

To prevent automated software from posting spam comments on your blog, you can ask visitors to enter a short code called a CAPTCHA, before they can post.

Turn on word verification:

  1. Sign in to blogger.com
  2. Select "Settings" from the drop-down menu.
  3. On the left, click Posts and comments.
  4. Under "Comments," select Yes for "Show word verification." Visitors to your blog will be shown an image of letters or numbers to type to get permission to comment.

With every visual CAPTCHA there will also be an audio version, for visually impaired users. Just click the icon next to the word verification field, and you will hear a list of numbers. Typing these numbers will let you complete the verification step.
Note: Even if you don't have word verification turned on, anonymous commenters might be asked to enter some text. This helps protect your blog from abuse.

Related Articles

Blogger Guide, Comment with OpenID


Blogger Guide, Comment with OpenID

OpenID is an open standard that allows users of OpenID-enabled services to log in to any OpenID-supported site with one set of login credentials. What does that mean for your blog? It's a way to authenticate user comments on your blog, without requiring your readers to have a Google Account. For example, let's say you have a friend, Brady from LiveJournal, who doesn't have a Google Account. With OpenID, he can now comment on your blog using his OpenID credentials and identify himself as the owner of http://brady.livejournal.com, instead of commenting anonymously. Please see the OpenID site for more information about OpenID.

How do I Enable OpenID Commenting on my Blog?

Simply go to your Settings | Posts and comments tab and select "Registered Users" or "Anyone" for the "Who Can Comment" option. Don't forget to click "Save Settings" at the top of the page.
Note that allowing "Anyone" to comment on your blog will allow more than just OpenID users to comment.

How do I comment Using my OpenID identity?

Start off by going to the comment page of the post where you'd like to comment. Then, select your OpenID provider from the drop down menu next to the "Sign-in using" option. If your OpenID provider is not on the list, please choose the "Any ID" option.
Next, provide your OpenID login information. After you click "Publish Your Comment," you will be redirected to your OpenID provider to authenticate your ID. After authenticating with the provider, you will return to the comments page and your comment will automatically be posted. Your comment will appear appear with a OpenID icon to the left of the comment.
Note that your display name is the name sent to us by the OpenID provider. If no display name is given, we will try to derive it from your OpenID URL. This is the name that will be displayed as the author of the comment and will be linked to your OpenID URL.

Blogger Guide, Moderate comments

Blogger Guide, Moderate comments


The ability to moderate comments gives you control over the kind of messages people leave on your blog. You can find the comment moderation (3) setting on the Settings | Posts and comments tab, along with all of the other comment settings:
Settings for comments 
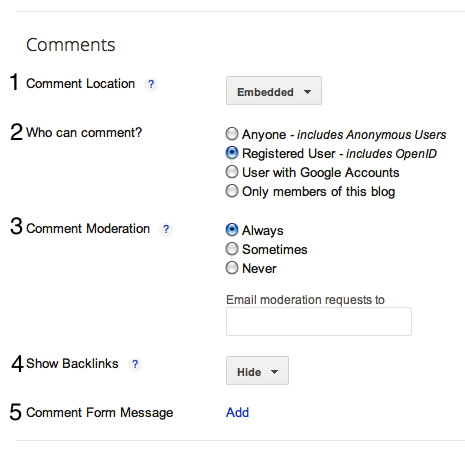
You can decide if you'd like to always, sometimes, or never moderate comments. If you select "Always," you'll have the option to enter in an email address where you can receive notifications that there are comments awaiting moderation. If you select "Sometimes," you'll be prompted to specify how many days old the post should be before it requires moderation. "Sometimes" is a good option for bloggers who want to make sure that comments on all posts are kept fresh and recent, and that conversation or debates on old posts aren't suddenly rekindled.
If you decide to set up comment moderation, all incoming comments will go to a special "Awaiting moderation" page, which you can find under the Comments | Awaiting moderation tab:
Settings for comments 
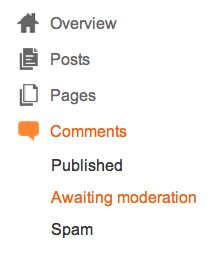
On this page, you'll see a list of all the comments that have been created but have not yet been approved or rejected. (This list excludes any comments made by admin members of the blog.)
Each line in the list displays the comment, the author's name, and the date it was created. You can approve or delete the comment, or mark it as spam by hovering over the comment and selecting the option you'd like. You can also select multiple comments and publish or reject them all at once by using the check boxes and buttons at the top of the list.
This entire process can also be done via email. If you entered an email address for moderation, you'll get a message for each comment which will contain "Publish" and "Reject" links, as well as a link to the main moderation page for the blog. The links provided will prompt you to sign in to your Google Account if you aren't already. The links will only work for new comments, and won't let you change the state of a comment that's already been moderated.
Notes:
  • Comments that have already been published or rejected are removed from the moderation list. Rejected comments are deleted and can't be recovered. Approved comments can be deleted in the usual way if you decide you no longer want them.
  • Only blog administrators will be able to moderate comments. Team members without admin privileges will not have access.

Blogger Guide, Leave comments on a blog

Blogger Guide, Leave comments on a blog

If someone has comments enabled on his or her blog, then you can usually find a "comments" link at the end of each post, like this:
View comments If you click this link, you'll see the comments that other readers have left, and the option to leave your own. The link might open a pop-up window, depending on how the blog owner configured their comment settings.
> Beneath the text field for your comment are the identity options. (The list might have other options, depending on the blog's settings.)
Options might include:
  • Google Account: If you choose this option, your comment will be attributed to your Blogger display name, which will then link to your Blogger profile. If you've chosen to link your blog to Google+, then the name used on your Google+ profile will show up next to the comment, and link to your Google+ profile.
  • Anonymous: If the blog owner has allowed anonymous comments, then you'll also have the option to leave a comment anonymously. If you leave an anonymous comment, it will not link back to your blogs, Blogger profile, or Google profile in any way.
  • OpenID: Learn more about what it means to use OpenID to leave a comment.
  • Other third-party sign-in options
Notes:
  • This article only covers Blogger's commenting system. Some Blogger users have installed third-party comment systems (e.g. Haloscan, Enetation, etc.) which will work differently.

Blogger Guide, how to Create a team blog

Blogger Guide, how to Create a team blog

Team blogs are quite useful when small groups of people wish to contribute to a single blog. Basically, one person initially creates the blog, then adds other people to it as members.
Team members can either be administrators or not. Administrators can edit all posts (not just their own), add and remove team members (and grant admin access), and modify the blog's settings and template. Non-admins can only create and edit their own posts.
Here's how to add members to your blog:

First, find the "Permissions" section under Settings | Basic.
 Settings | Basic
Then click Add Authors:
Add authors
Next, type the email addresses of the people you're inviting to the blog, separating each address with a comma. They'll receive an email with a confirmation link soon. Note that they must have Google Accounts, and if they don't already, they'll be prompted to create one.
Add User
When you're ready to send the invitations, click OK.

Related Articles:

Blogger Guide, Why do I have word verification on my posting form?


Blogger Guide, Why do I have word verification on my posting form?

Word verification on the posting form is meant to be a spam reduction mechanism for BlogSpot in general. There are two potential causes:

Potential Spam

In this case, word verification is applied to certain potential spam blogs by an automated system. Because this is automated there will necessarily be some false positives, though we're continually working on improving our algorithms to avoid these. If your blog is one of the false positives, we apologize. Having the word verification on your posting form does not prevent you from publishing and does not mean that your blog will be deleted or otherwise punished if it is not actually in violation of our policies.
To avoid further inconveniences when publishing, click the "?" (question mark) icon next to the word verification on your posting form:
That will take you to a page where you can request a review for your blog. We'll have someone look at it, verify that it isn't spam, and then whitelist your blog so it no longer has the word verification requirement.

High Posting Rate

If you make a large number of posts in a single day, you will be required to complete a word verification for each one, independent of whether your blog has been cleared as a potential spam or not. If this happens to you, simply complete the word verification for each post, or wait 24 hours, at which point it will be removed automatically.
This restriction is in place as much to control the load on our servers as to prevent explicit spam. Therefore, there is not a whitelisting review process to exempt individual blogs.
Notes:
  • In cases where word verification is required, all posts made via email will be saved as drafts, rather than published.
  • This is unrelated to the word verification setting for comments.
  • If your word verification is continually reported as incorrect, even though you are entering the correct letters, please try logging out, clearing your browser's cache and Blogger.com cookies, then logging in again to post. Remember to copy and paste your post to a text file first, to keep it safe.